
Tutorial 1 -- How to add a contact, lawyer or client
All contacts, lawyers, clients and other such entities are entered into the Case Threads system through the same screen. This single input screen approach is very different from what is commonly seen in this type of software. This tutorial will walk through the process of entering Jane Smith, who is a contact at a client named "My Client". One way to enter a client contact would be:
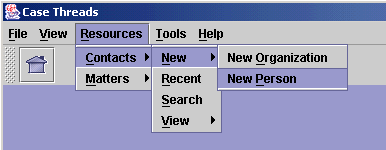
1) From the main menu, select Resources | Contacts | New | New Person
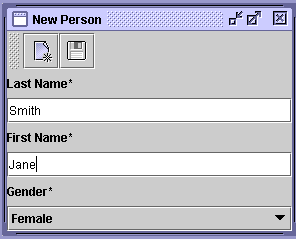
2) When the New Person screen appears, enter the first and last name and select the appropriate gender. Remember that, fields marked with an astericks, as in "Last Name*" are required fields. Click the Save button.
3) When the save process completes, the full contact data entry screen will appear.

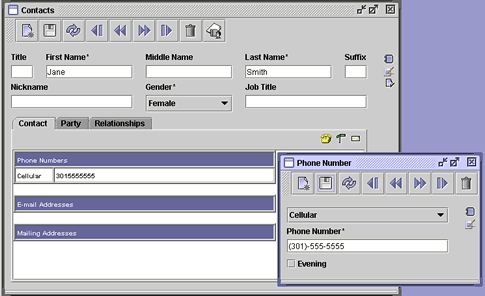
Notice that all the required fields have been filled: First Name, Last Name, and Gender. Enter any additional information about the person and click the Save button.
4) Adding phone numbers, street addresses and e-mail addresses all follow the same process. Such items are found on the Contact Tab. The three icons situated in the right hand corner of the Contact Tab allow the addition and maintenance of this data.
![]()
To add a new phone number click the phone icon. A message will appear explaining that there are no phone records assigned to the current person. Click the OK button and the Phone Edit screen will be accessible.

First, select a phone type as shown in the screen shot below.
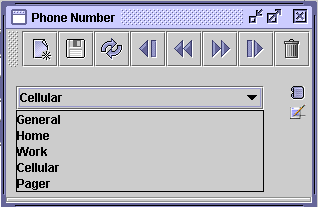
In this case, it will be a cellular phone number. Then enter the actual phone number and click the Save button. Notice that after the record is saved the phone number appears in the Contact Tab under phone numbers.
You can add more phone numbers if you wish by click the New button and repeating the above steps. In addition, the insertion of street addresses and e-mail address are accomplished in similar fashion.
5) The next step is to classify your newly added person. A person may take on many different roles and classifications. Parties essentially label a person into different groupings. Parties are fully user definable, so it is important to remember that the data shown here will not reflect the data in the real world.
Click on the Party Tab and click on the party edit icon in the upper right hand corner of the tab. The following window will appear:
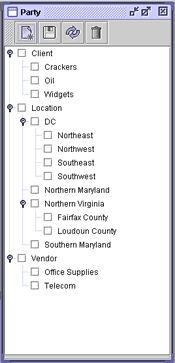
Jane Smith works for the local widget company, so check the Widgets box and click the save button. This classification system makes searching very easy allowing such functional searches as: show me all clients who make widgets in Northern Virginia.
6) The final step in entering Jane Smith information is to specify her relationships to other persons and organizations in the system. This step is accomplished through the Relationship Tab. Click the Relationship Manager button in the top right hand corner of the Relationship Tab. Click OK when the message box explaining that there are no records entered yet appears. After that the following screen will be visible:

First, select the Relationship Type. In this case, select "is employed by" as the type. Then type "My Client" in the Relationship With text field and click the Validate button, which is the icon with the hand and red checkmark. The text "My Client" should appear bold. Finally, enter the Effective Date of the relationship and click the Save button. Note that the relationship appears in the Relationship Tab on the Contact screen.
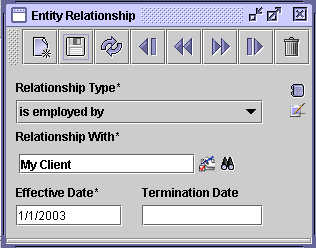
By establishing this relationship, two things have happened. There is now a relationship between Jane Smith and a company called "My Client" where "Jane Smith is employed by My Client". There is also a reciprocal relationship where "My Client employs Jane Smith". This data allows for another powerful searching technique, where it would be possible to request a list of all the Contacts for a particular Client.